Baerlic Vest

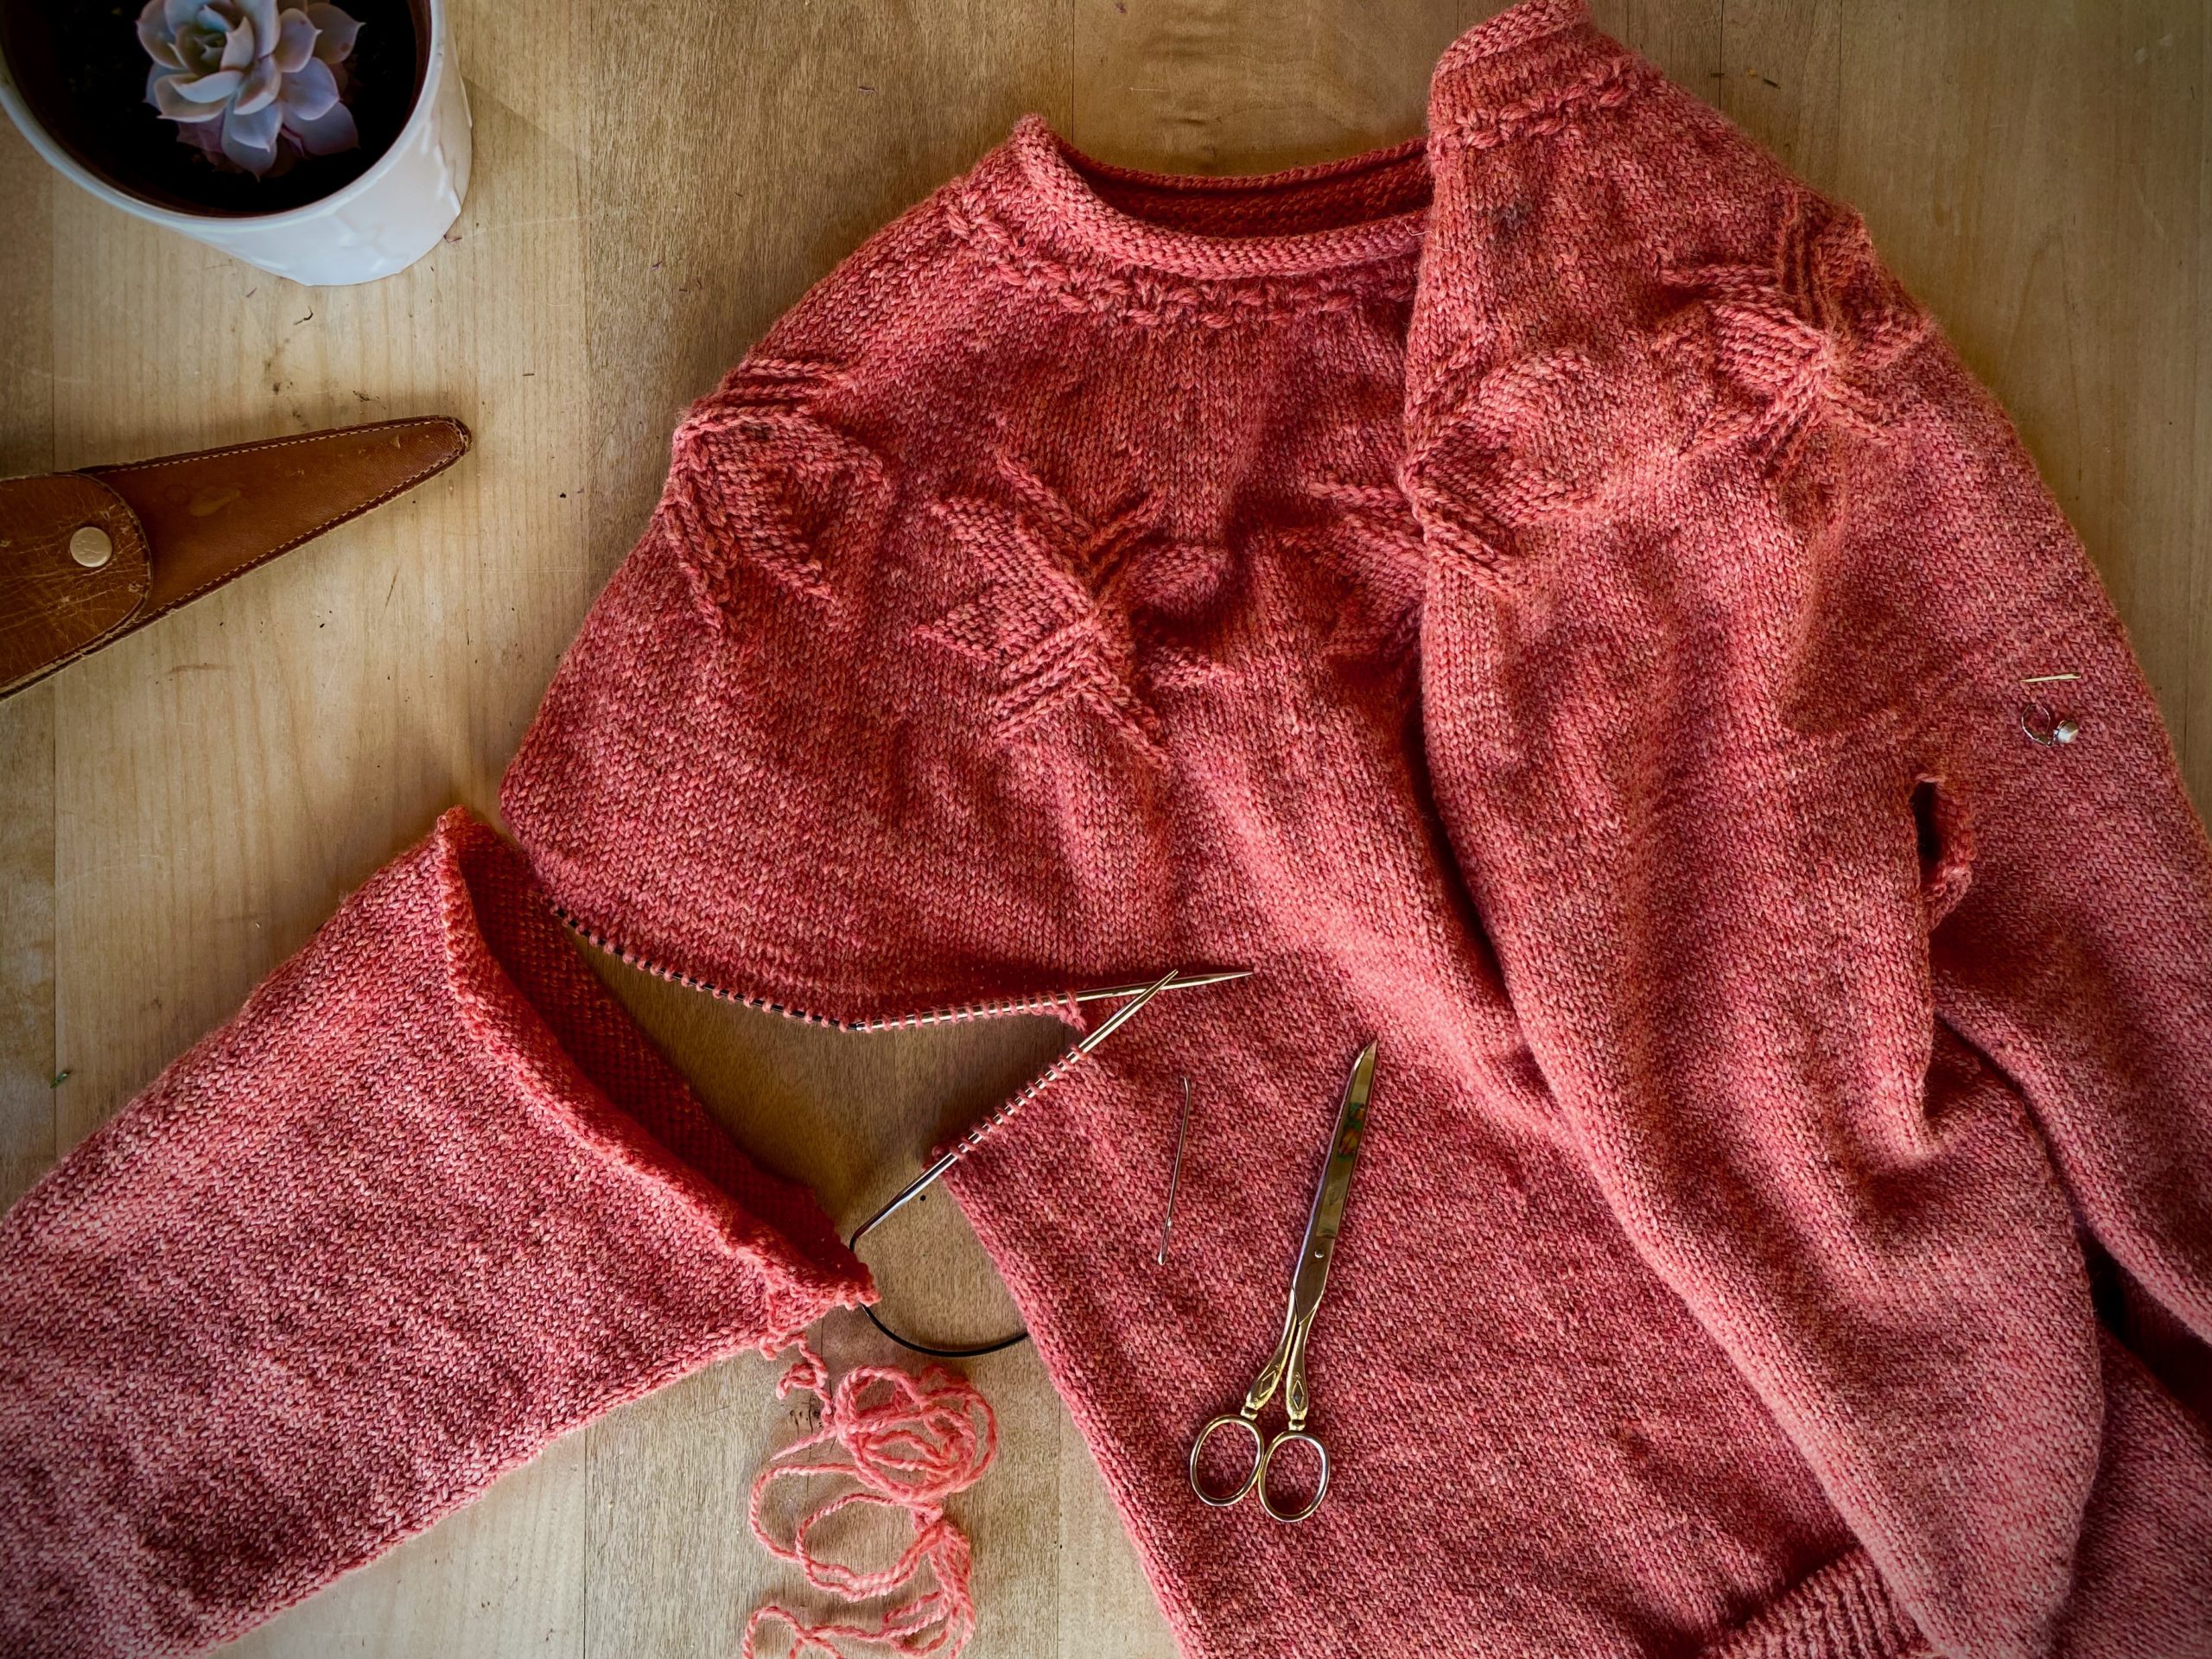
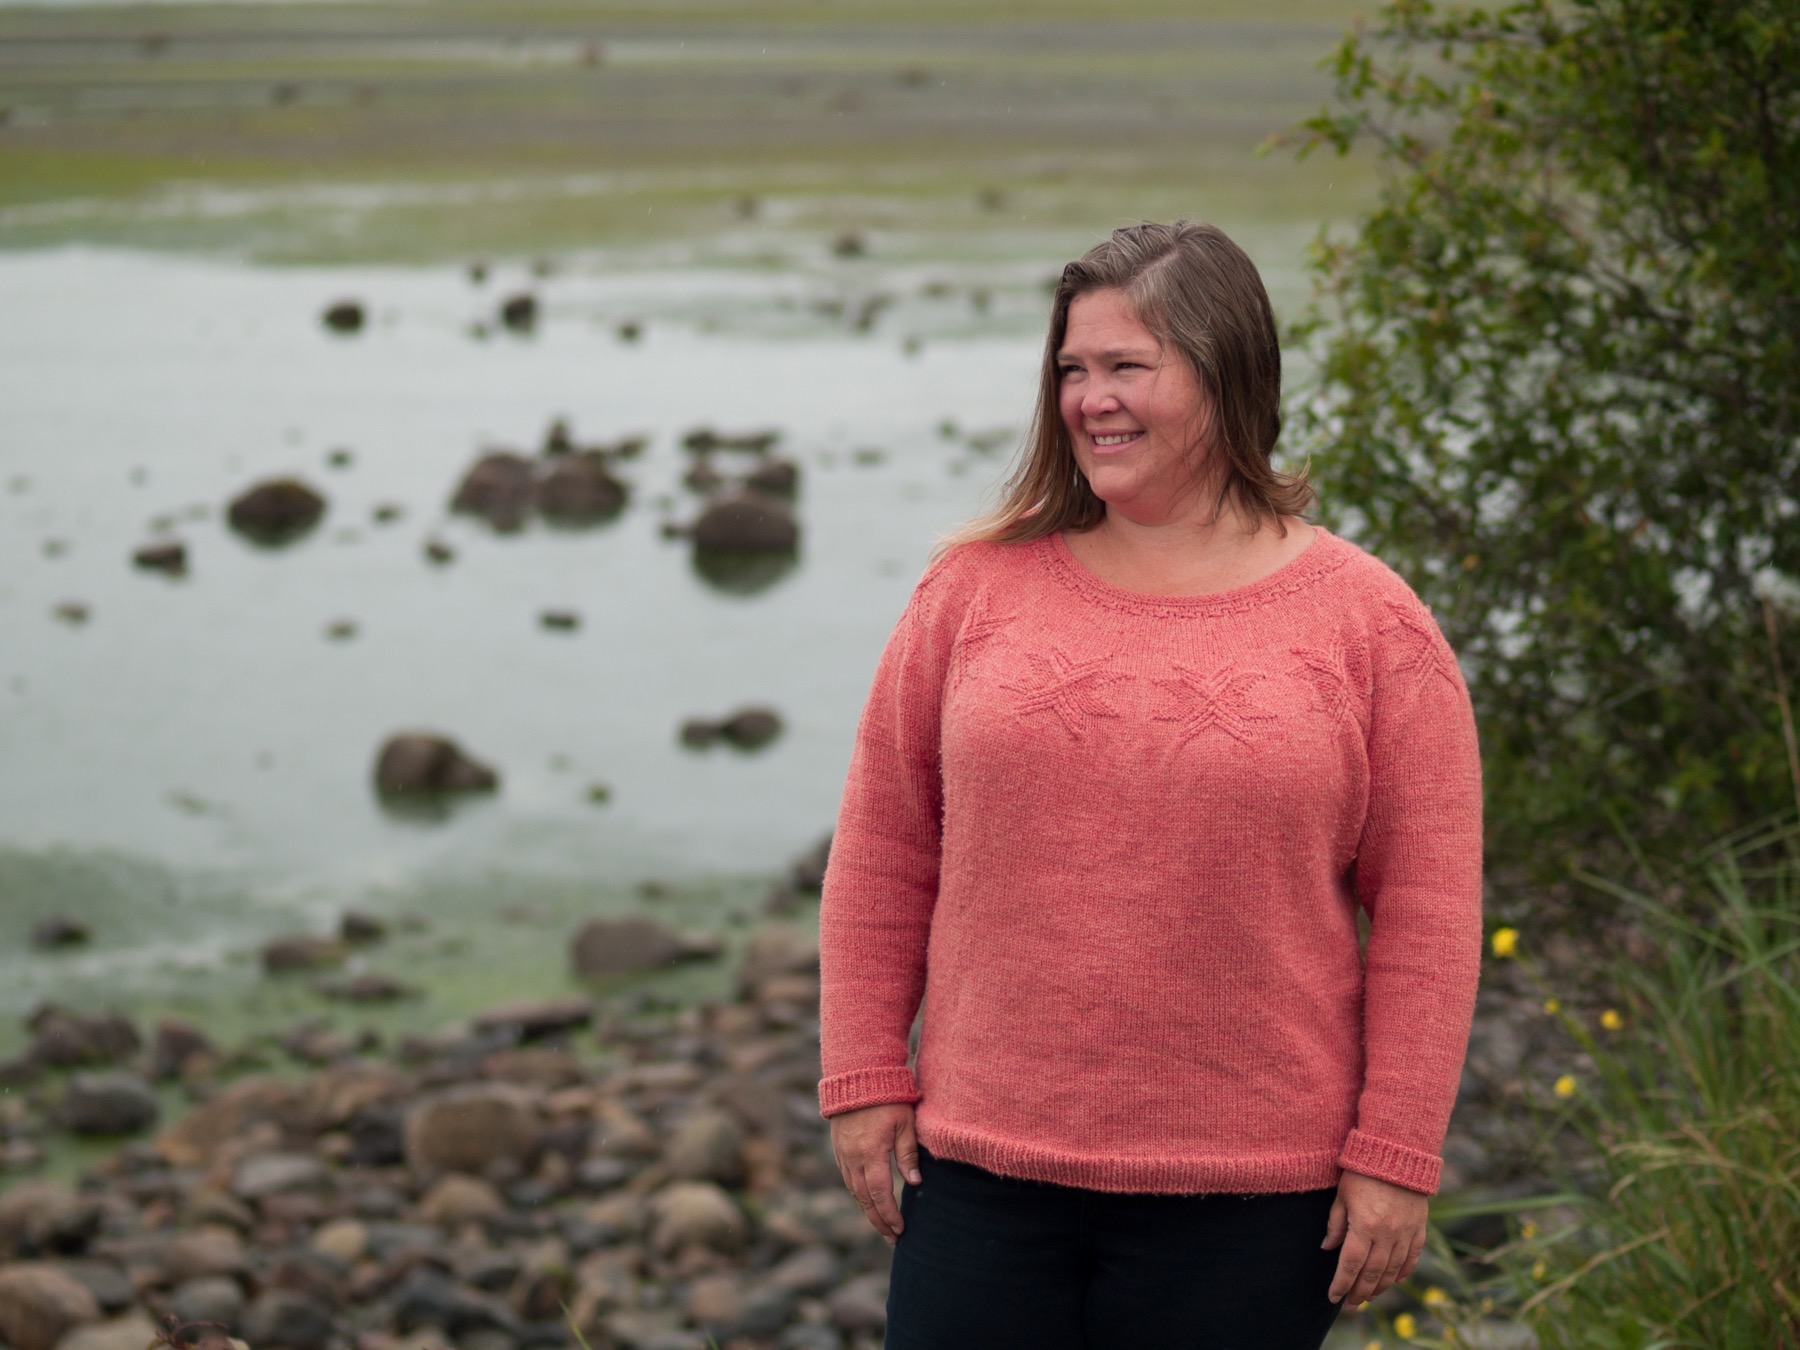
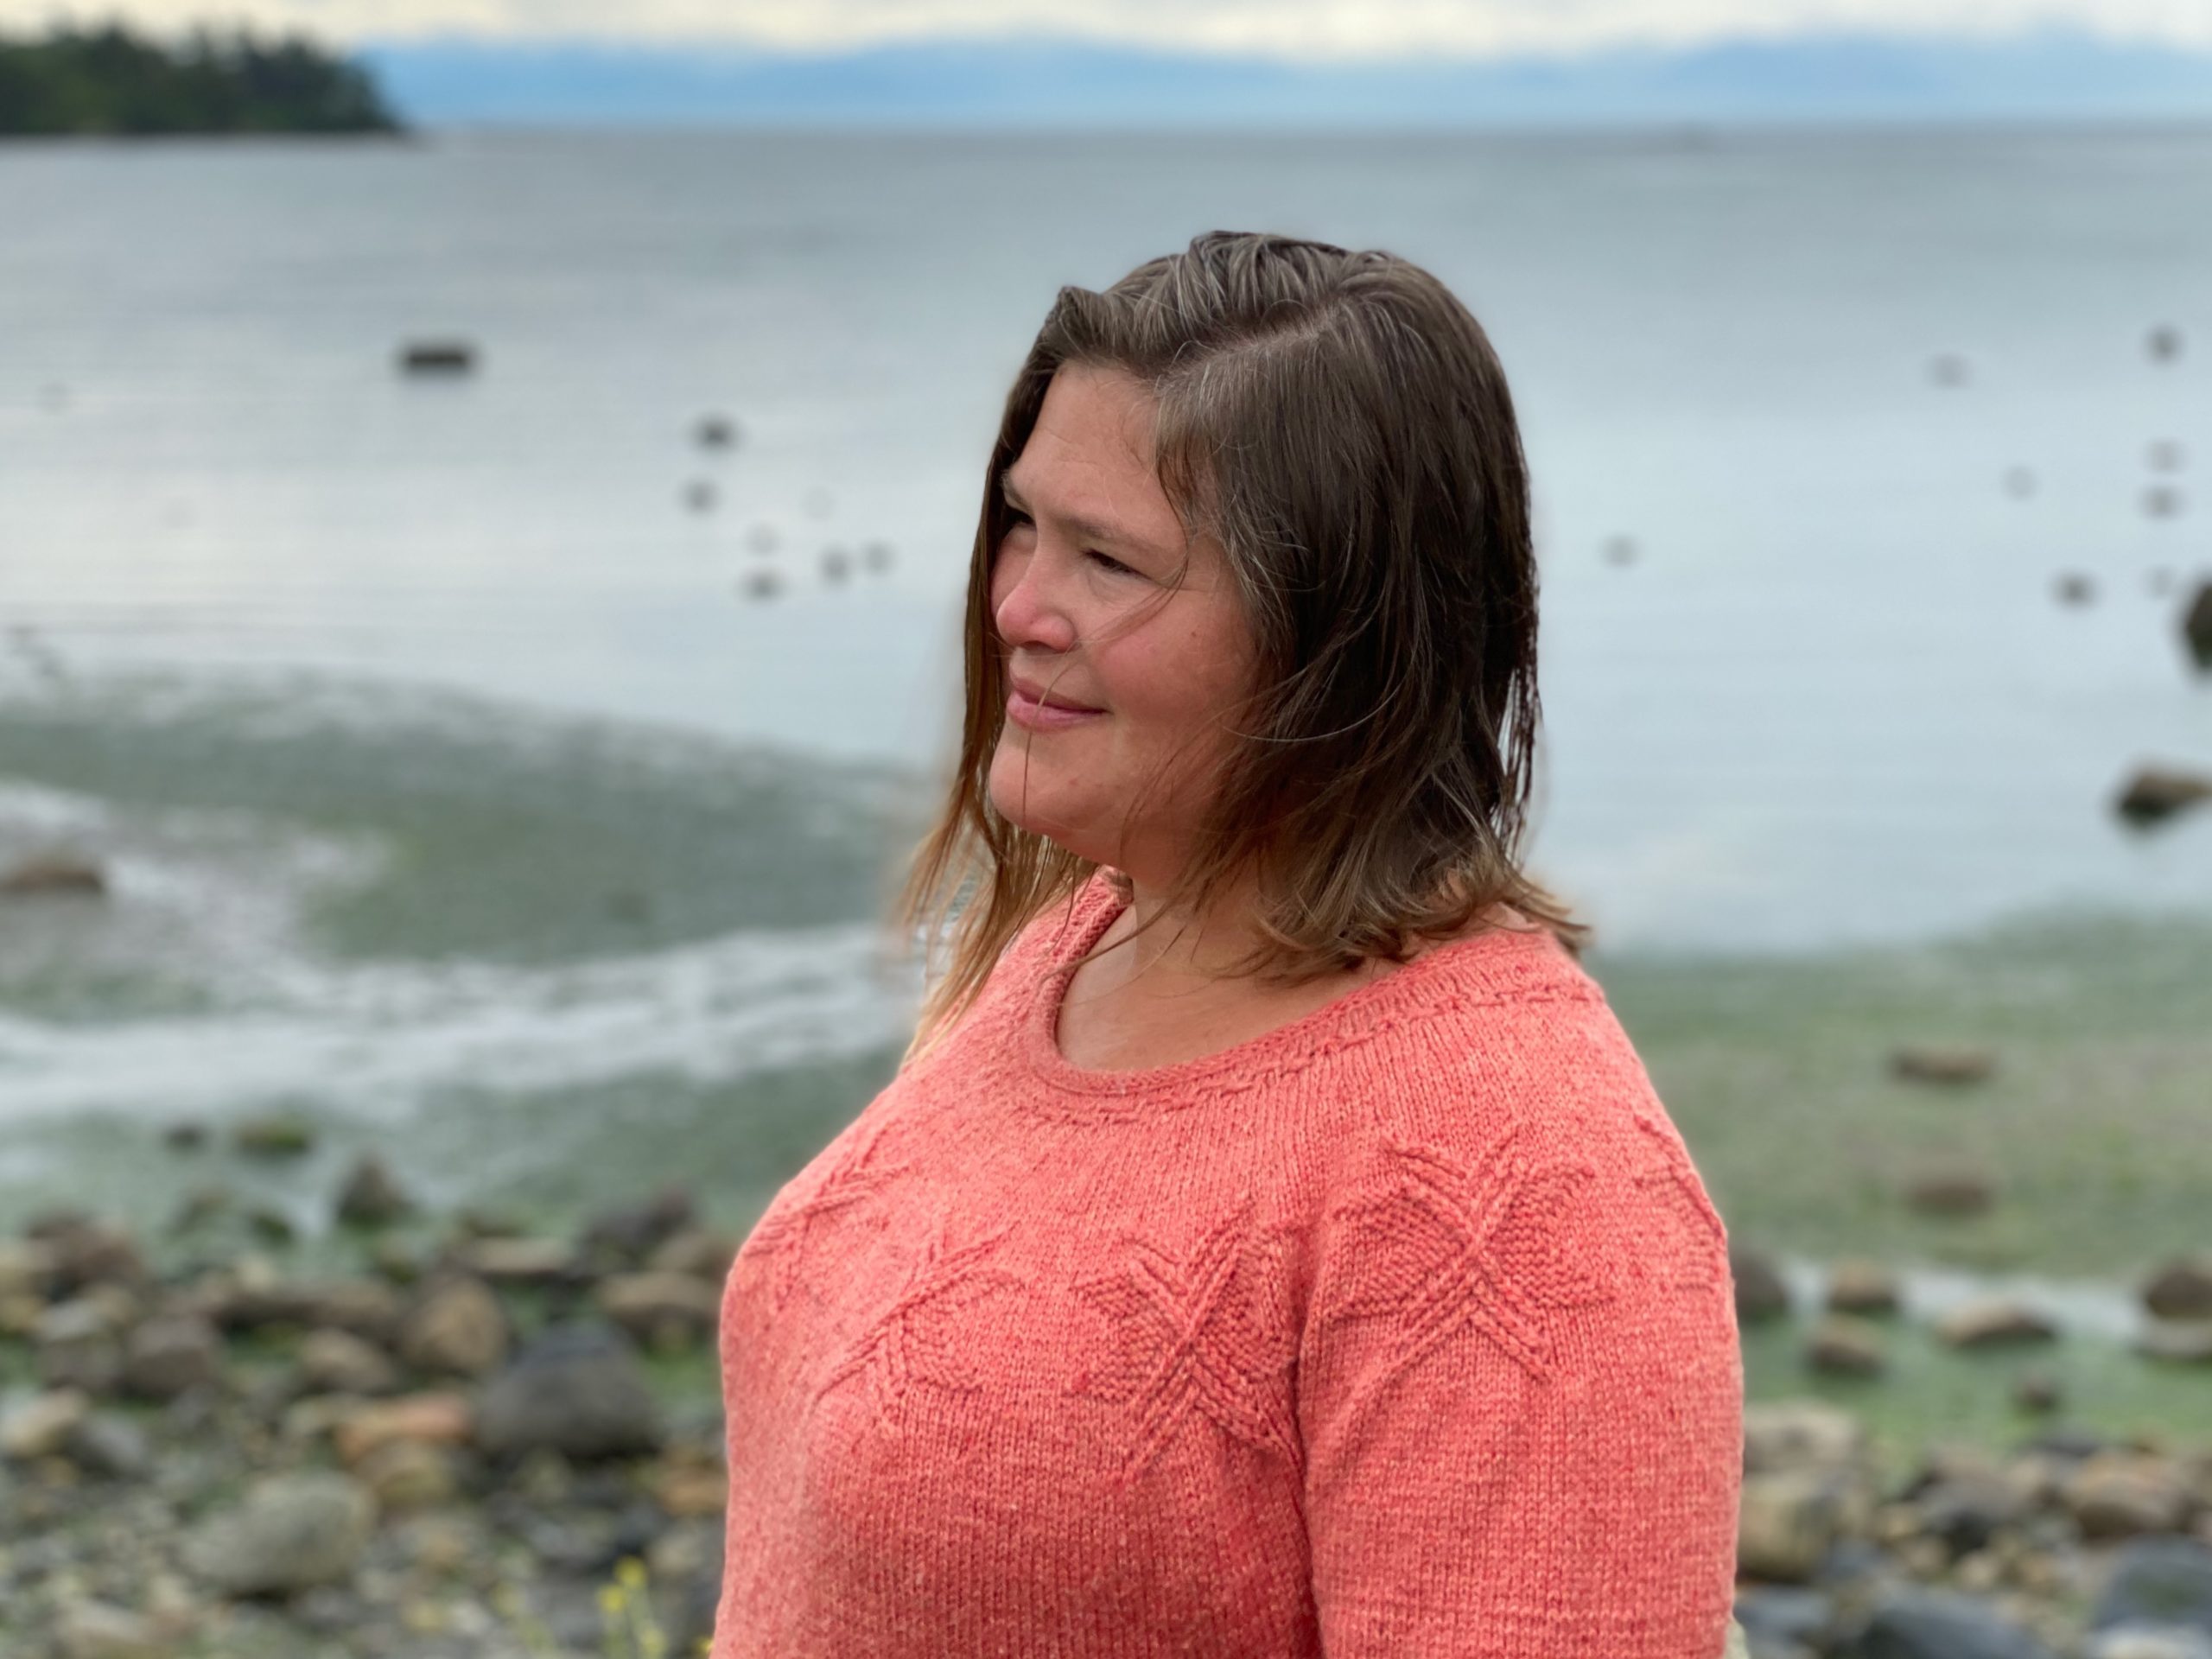
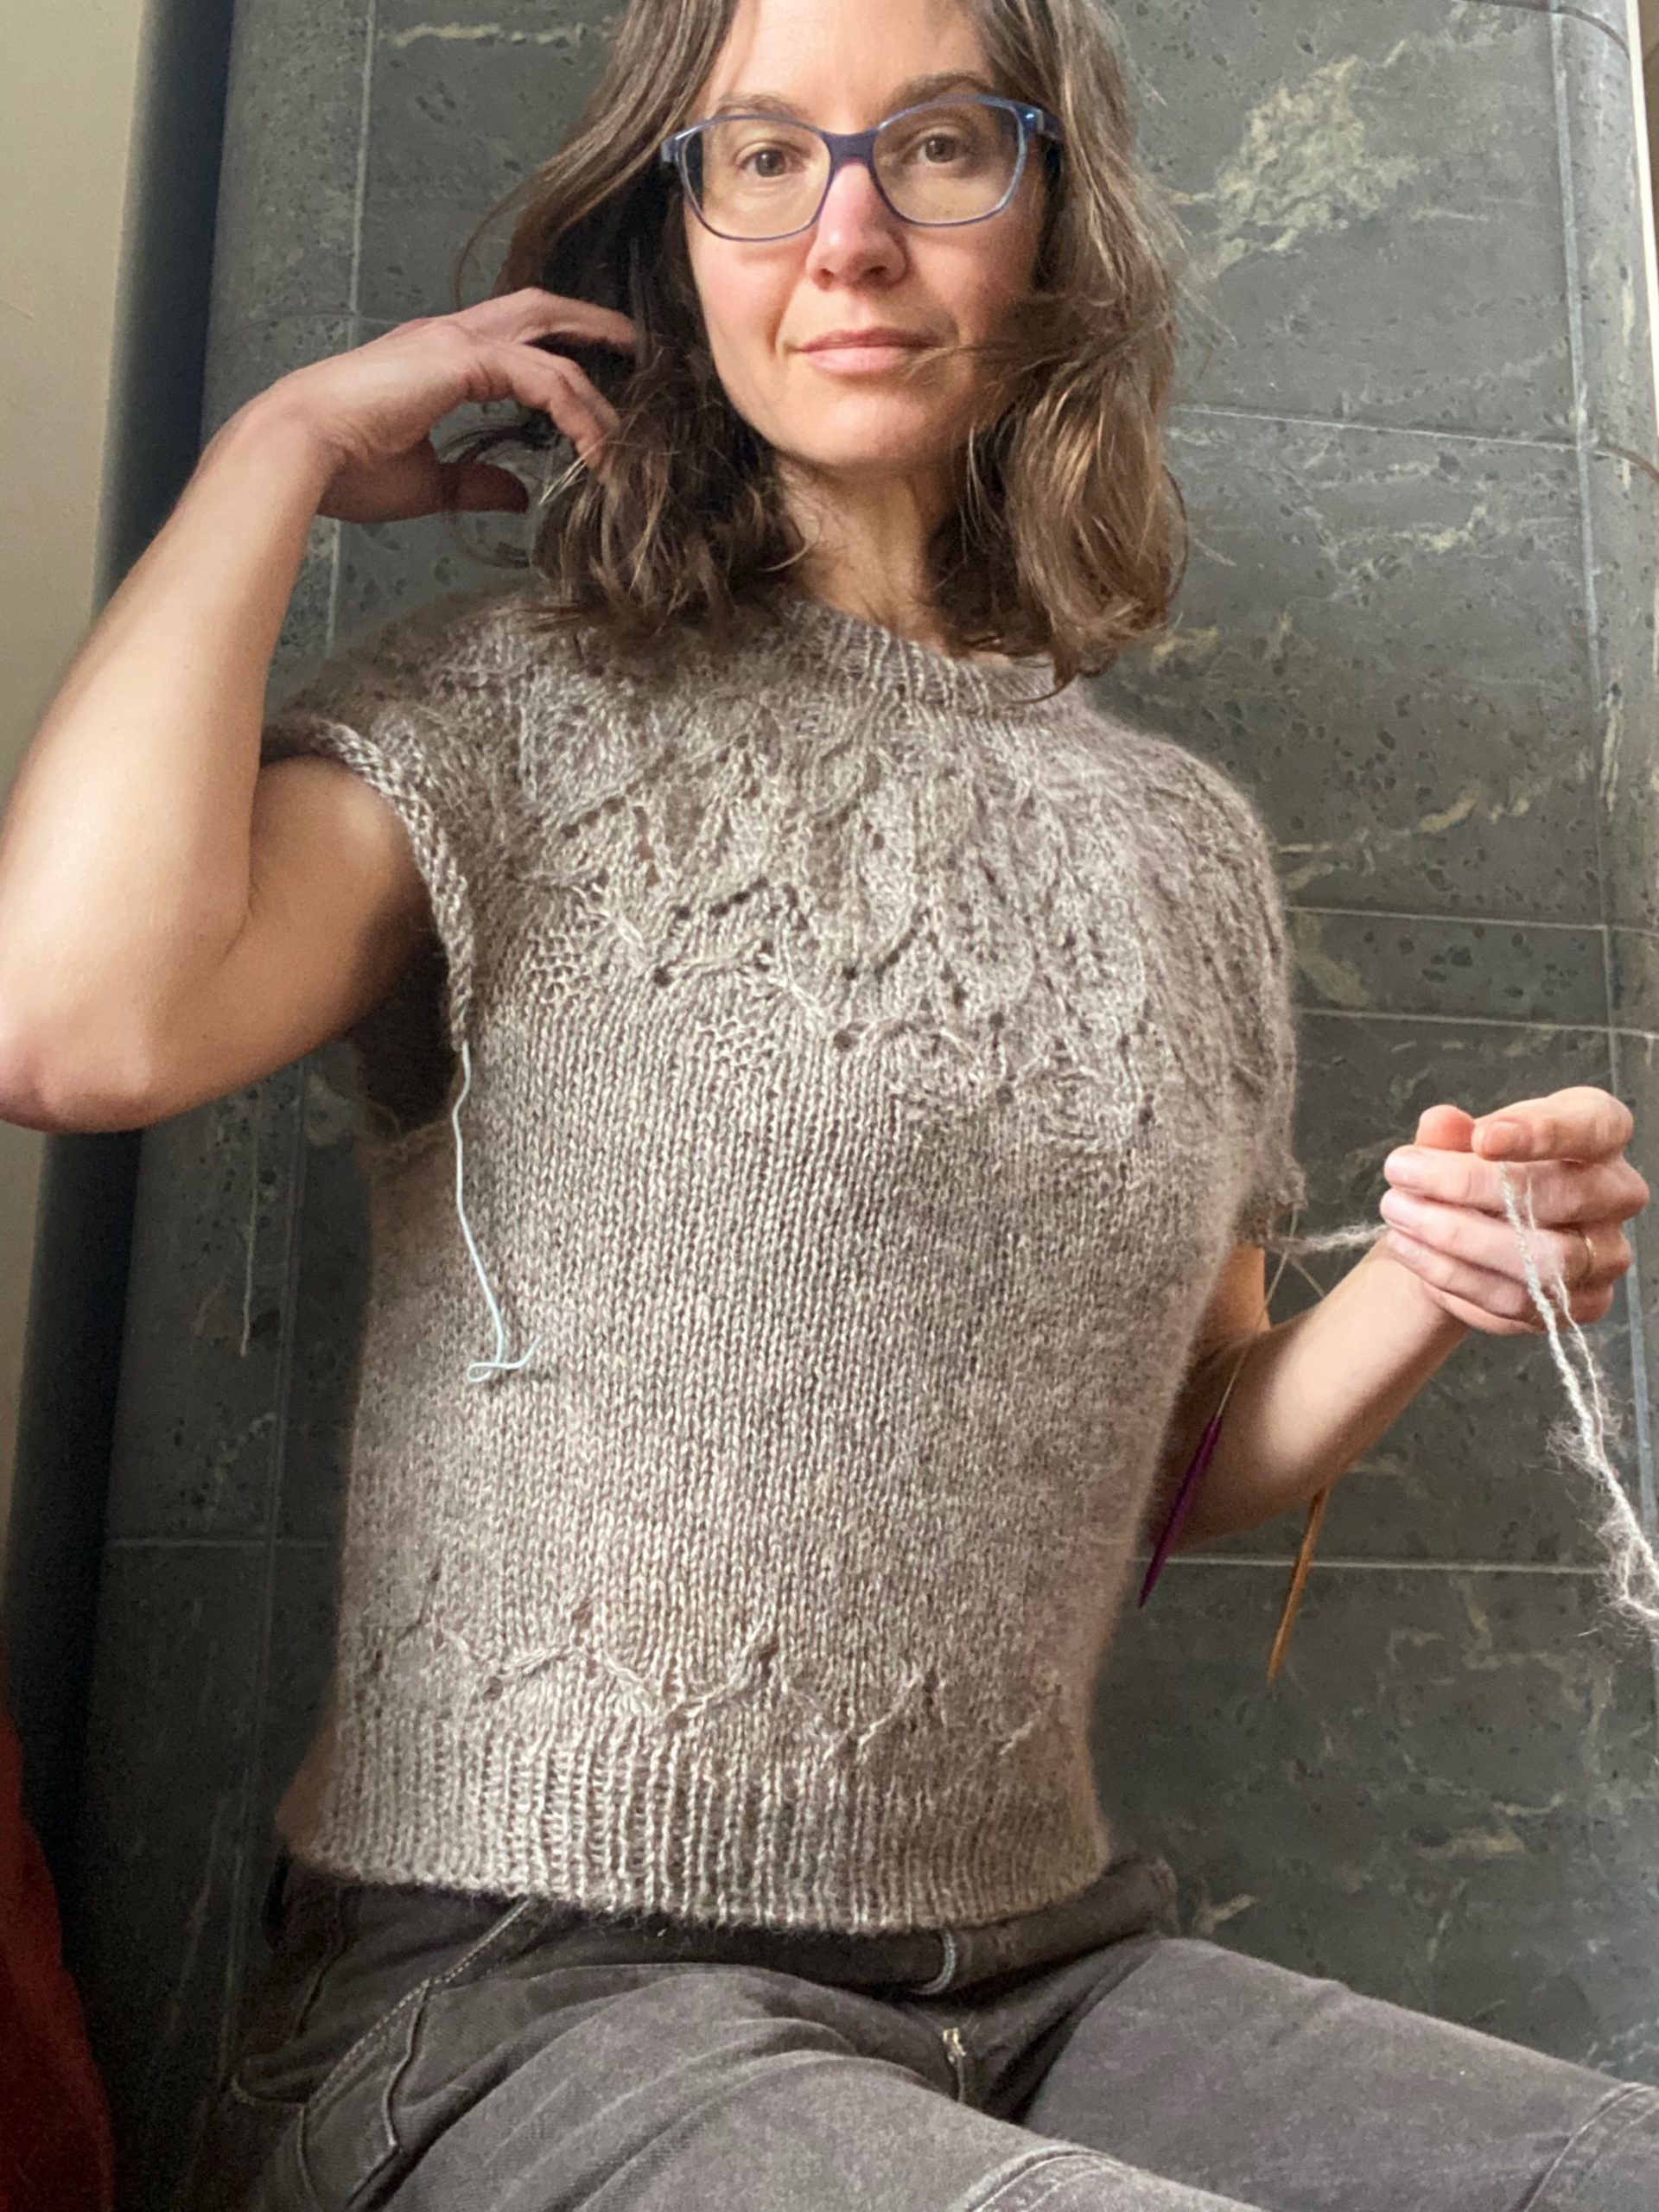
My design collaboration with Hinterland Yarn will debut at Knit City Vancouver this weekend! The Baerlic vest uses two strands of Hinterland Dusk held together for a marled effect, and the front is decorated with clusters of dip stitches that remind me of heads of grain (hence the name—baerlic is an old English form of the word barley). The vest is sized up to a 67″ (170cm) circumference and the pattern is loaded with options to make it work for your preferences: cropped length; regular length with a gentle A-line; split hem lengthened in back (or not); crew, turtle, or cowl neck band. It even has notes on how to split sizes to accommodate a fuller bust or tummy, because I really just want you to end up with a garment that’s exactly right for you. The fabric of reverse stockinette is bordered by edging in garter rib, and the photo above shows the traveling stitch faux-gusset detail that allows the rib to flow unbroken all the way up to the shoulders.

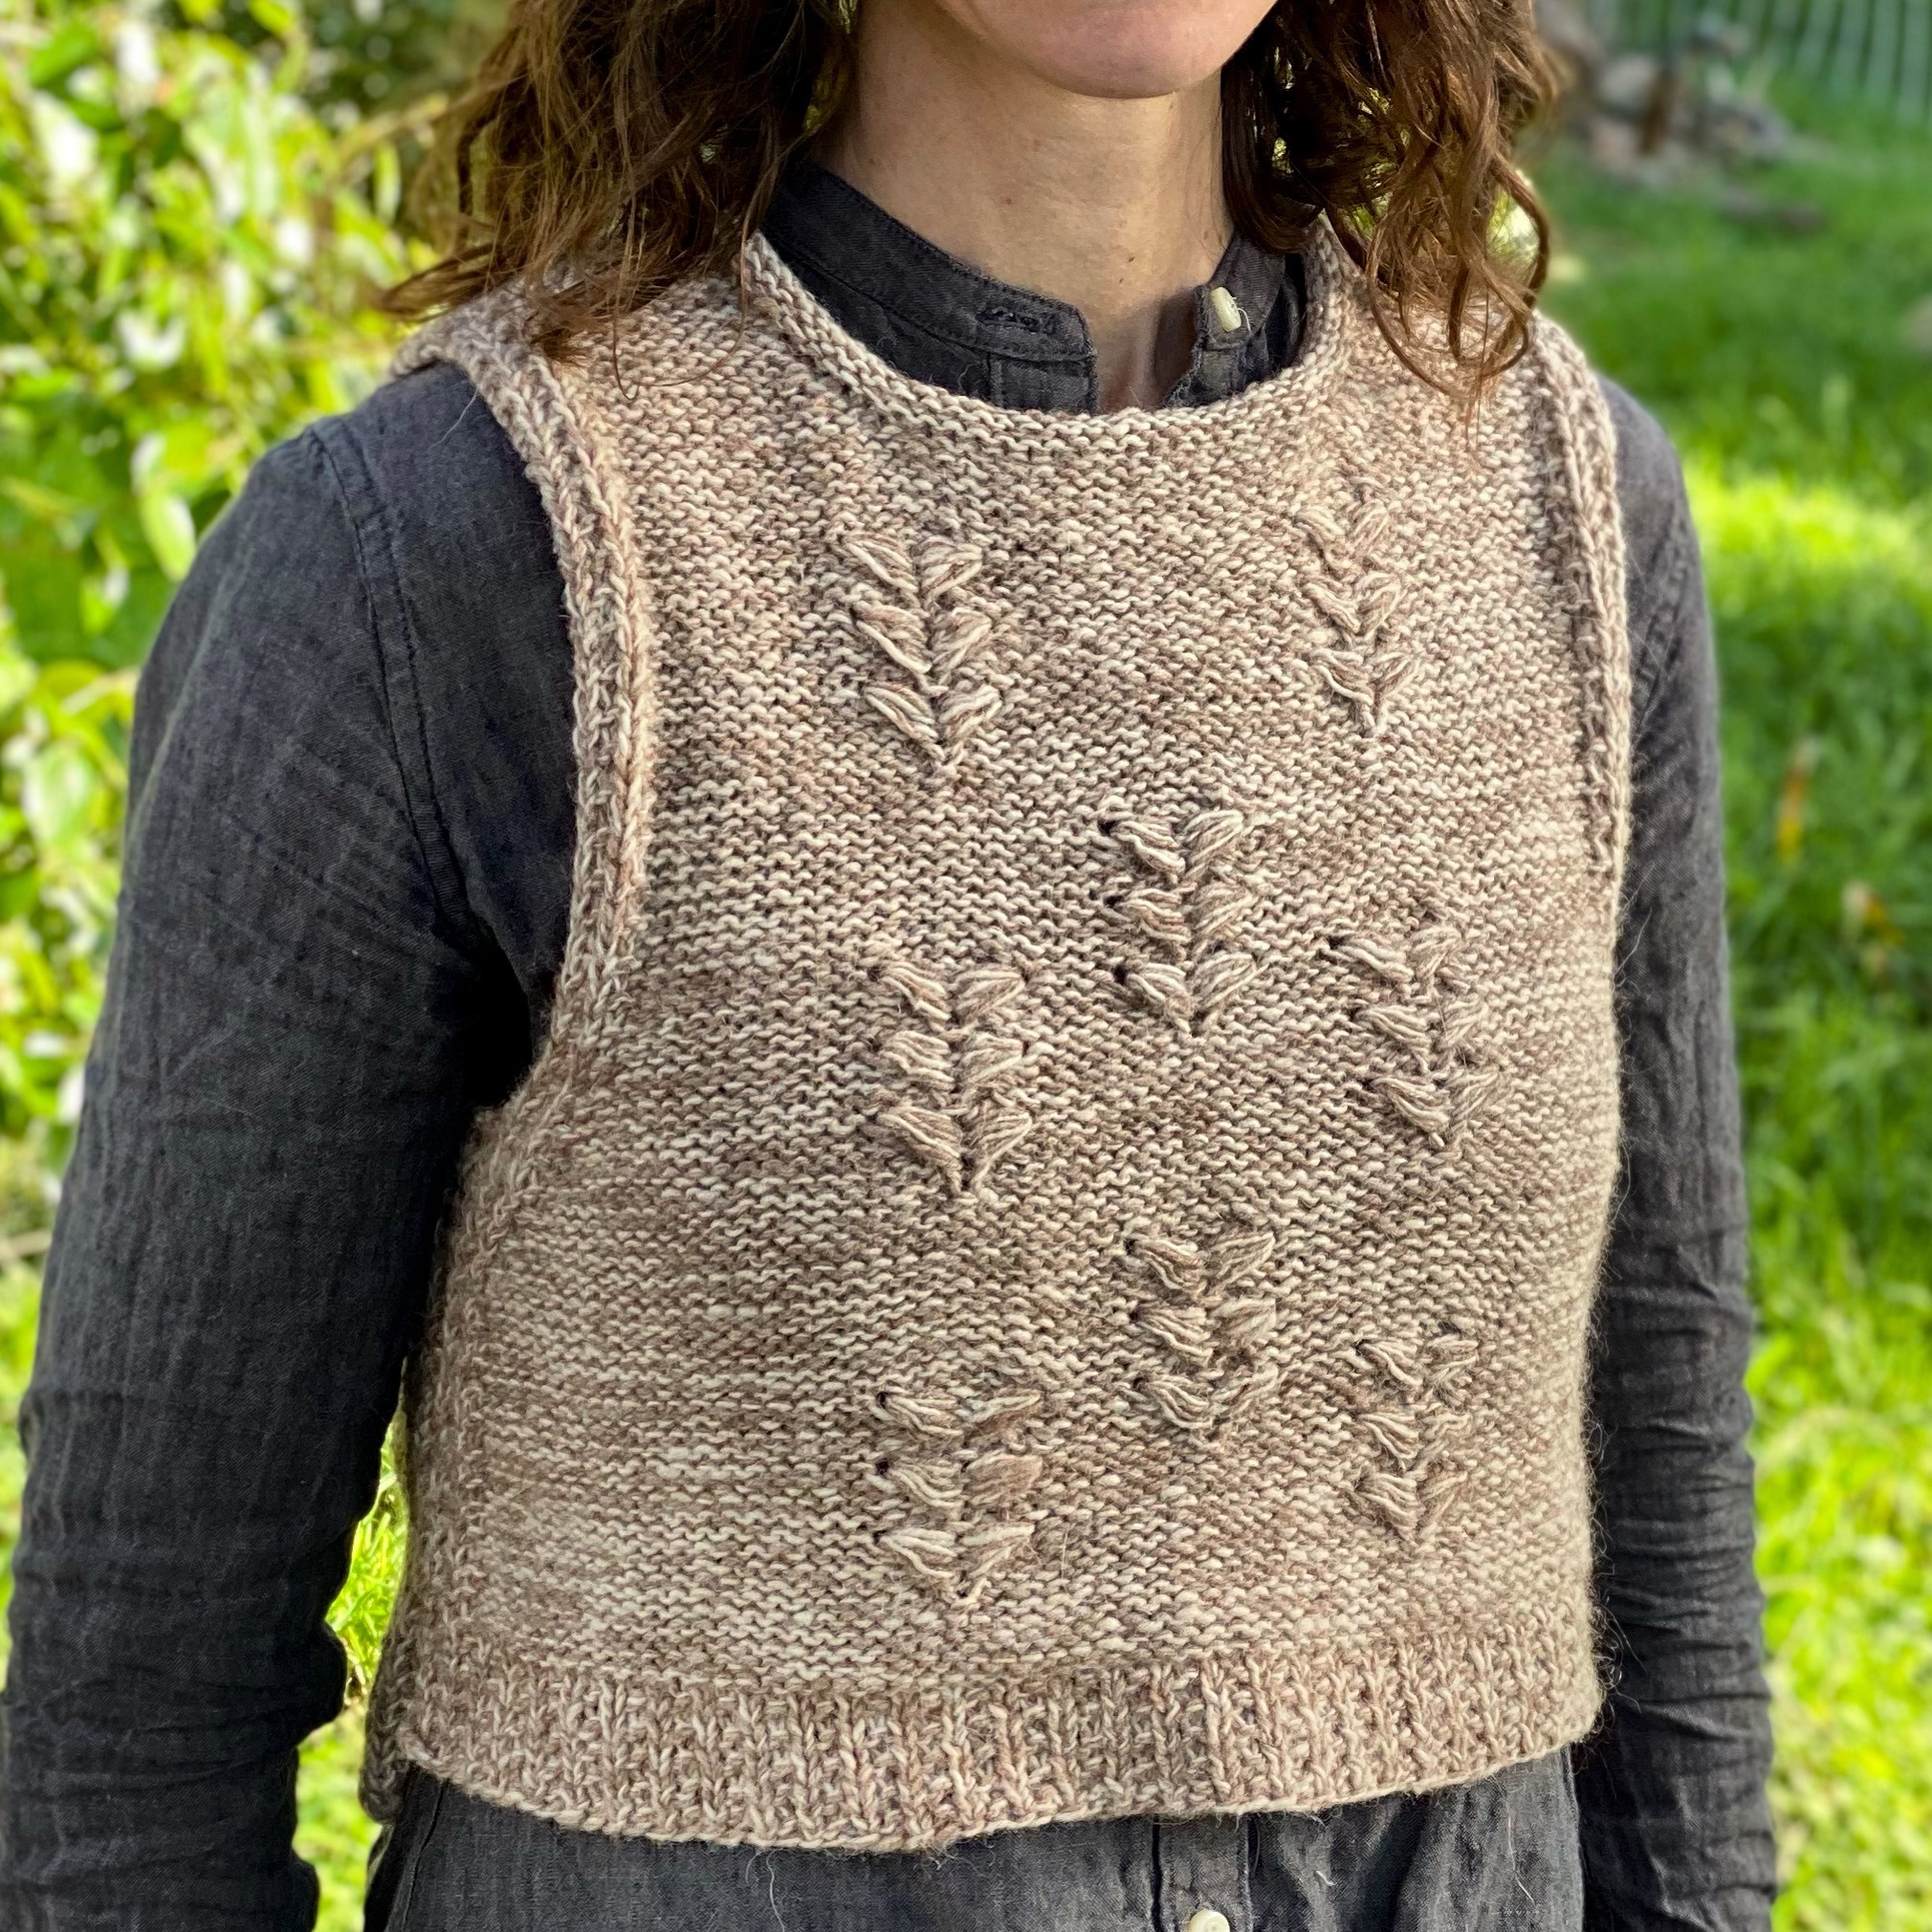
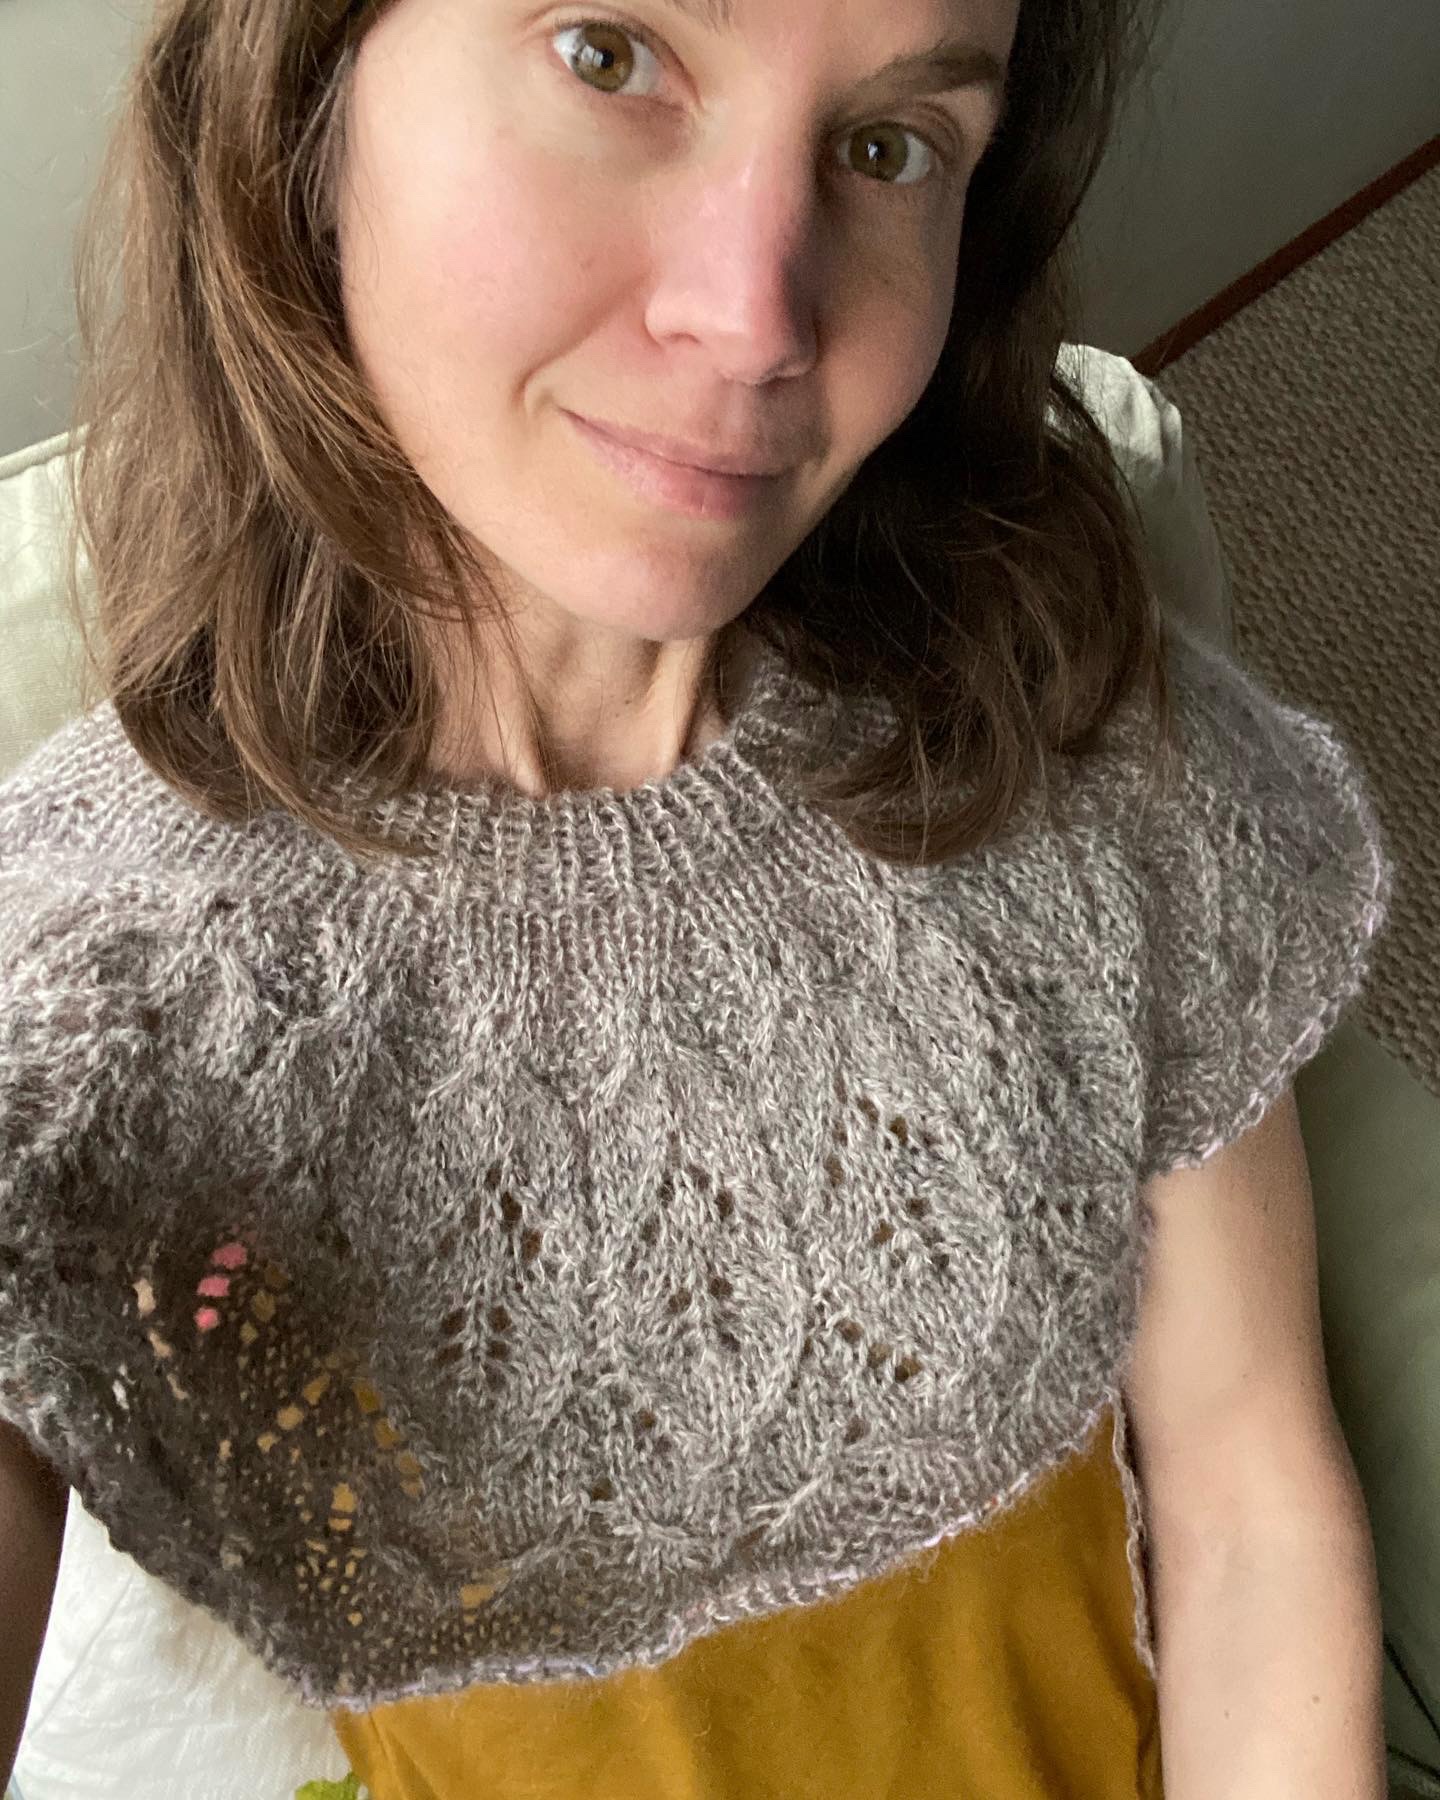
Here’s a better look at those dip clusters! There’s video up on my Tutorials page that will help visual learners make sense of the motions required to form this engaging surface texture. My Baerlic sample was knit from Hinterland Dusk, a fingering-weight Rambouillet/alpaca singles in colors Honey and Maple, on US #9 needles. You could substitute an Aran-weight yarn that will knit to gauge if you prefer a solid-colored fabric, but the idea of the marl in this rustic yarn was a big part of the design inspiration.

If you’re in Vancouver, BC this weekend, you can check out the sample in the Hinterland Yarn booth, and then you can swing over to the San Juan Woolworks booth and ask me any questions about it! If you can’t make it to Knit City, the pattern is available to purchase on Ravelry. Happy knitting!

Round Yoke Mods, Part II

Shifting the sleeves

The premise: People who have a difference of greater than 2” between their full bust and high bust measurements will benefit from pattern adjustments that assign more fabric to the front of their sweaters than to the back.

I am not an example of this body type, so thanks to my friend Brooke for modeling!

First of all, credit once again to Amy Herzog for teaching about these ideas and introducing practical strategies to help us get there. I also want to point to the work of Jacqueline Cieslak and Jessie Mae Martinson, designers who are contributing greatly to our store of size inclusive patterns and writing those patterns in a way that empowers knitters to achieve the fit they prefer.

So what’s your high bust and why does it matter if you measure it? Bodies come in all shapes and sizes, but most pattern drafting makes assumptions about average proportions that may or may not align with yours. There’s less difference between people’s skeletons than there is in their musculature and fat. If you measure your circumference right up under your arm pits, you obtain a number that correlates better to the size of your shoulders than your full bust circumference does. You might have a 52” full bust but only a 47” high bust; choosing a sweater size based on the 52”—with added ease—may well result in a garment that’s much sloppier through the shoulders than you’d like. You’re better off working from the 47” measurement and adding fabric for the bust via extra shaping or bust darts. If you’ve never worked bust darts before, I really like Jacqueline Cieslak’s approach in her pattern book Embody, which uses schematics and tables to help you find the right shaping pathway for your measurements and walks you through the short row bust dart method with great results. (I don’t personally ever get to add bust darts, but I have friends who do and their sweaters from Jacqueline’s patterns look terrific.)

As far as I know, Amy Herzog was the first to recognize that round yoke sweaters offer another, easier way to assign more fabric to the front than to the back: you just move the sleeves. I started experimenting with this on my Seven Sisters yoke design when I was regrading it for independent release and a friend who’s in the >2” bust difference category was one of my test knitters.

I made this modification to Brooke’s sweater after it was complete; if you want to follow along there’s a step-by-step documentation of the process on my Instagram feed as a highlight called “Sweater Surgery.”
The sweater after the successful sleeve shift.

I calculated the difference between her high bust and full bust measurements as a number of stitches at my pattern gauge. Four inches = 22 stitches for this sweater, so I divided 22 in half and moved each sleeve toward the back of the sweater by 11 stitches at the point of the union round where I joined the body and sleeves. She wears her Seven Sisters sweater often and so I have lots of chances to see how it works on her body in motion. It’s working out just fine, but I actually think that I could have moved each sleeve by 8 or 9 stitches to give her a tiny bit more ease across the back. When we look at ourselves in a mirror to see how a garment fits, we tend to let our arms hang at our sides, so the garment is as undisturbed as possible. But we humans do a lot of activities that involve moving our arms around in front of our bodies, and our clothes should give us room to do that without pulling or distorting. So now I think, calculate your shift according to the different in full and high bust measurements, but then cheat back towards the front by a couple of stitches on each side.

A few weeks ago, another friend pinged me for help diagnosing what was going wrong with a yoke sweater she was knitting. This friend is built like me, long and lean, and she’s recently had a mastectomy. It was my conversation with her that set me wondering about the reverse of a full bust adjustment for yoke sweaters. I thought back to my blue raglan, which is slightly wider across the back yoke than the front. Why not try the same thing on a round yoke? It stands to reason that those of us who are flat chested and whose shoulders naturally roll forward a little bit might benefit from more fabric across the back of the sweater than the front. I decided to try it on my current project, Leila Raven’s ‘Aina pullover.

I started by placing the yoke on waste yarn, blocking it—it’s lace, so I really needed to see what the fabric would do once it could open up—and assessing how it wanted to hang from my shoulders. I could definitely tell that it needed less fabric across the front. The difference appeared to be about one repetition of the lace motif, or ten stitches, so I tried moving the sleeve divide point towards the front by five stitches on each side. I went ahead and knit a few inches of fabric on the torso—you’ve got to stabilize the stitches and create enough fabric to give you useful information—and tried it on again. Even without blocking, I saw signs that I’d gone too far. Five stitches is more than an inch of fabric at this gauge, and I was getting pleats across the back and a little bit of tightness at the points where the sleeves meet the chest up front. So I ripped and did a forward shift of just two stitches on each side—half an inch of fabric. This is closer to the difference in cross back and cross front I calculated for that custom raglan in Amy Herzog’s workshop. Lesson learned: don’t let your zeal for modifications run away with you. A subtle shift can be all you need.

‘Aina sweater drying…again. Big thanks to my soapstone wood stove.

The ‘Aina pullover torso is complete; I’ve now blocked my partial sweater for the second time. This might sound excessive, but I’ve finished too many sweaters that don’t fit well over the years and I’d rather know as soon as possible if course corrections are necessary—in this case, before I add sleeves. (Also there’s mohair involved, and if you’ve ever tried to frog mohair you may be wise to the fact that it’s probably a similar time investment waiting for the sweater to dry… but with far less cursing.)

The deep yoke, lower sleeve set is a little more “fashion” than my usual, but things are looking good. On to the sleeves!

Next time I’ll talk about the vertical distribution of shaping rounds—doesn’t that sound scintillating? This is an aspect of yoke design that really makes a difference to fit, and it’s a trickier fix that involves willingness to color outside the lines if you’re working from a chart.

Round Yoke Mods, Part 1

I love knitters. The fact that I can post a super nerdy and long-winded ramble—you wouldn’t believe how much I had to cut to beat the “your caption is too long” message—about where to connect your sweater sleeves to your sweater body and the knitters of Instagram will just gobble it up? It gladdens my geeky heart, it really does. It also tells me that folks are hungry for knowledge about how to get better results from their hours and hours of patient making. I have a whole lot of thoughts on this subject, and I want to record them somewhere more accessible and easier to reference than Instagram, so let’s consider this the start of a little blog series.

My current round yoke project, which sparked the conversation on Instagram last week

Acknowledgment: I did not invent this stuff; some people have formal training in it and you should learn from them.

I’ve been privileged with time and resources to follow my curiosity on sweater fit. One of the most valuable experiences I’ve had was the opportunity to study with Amy Herzog in a day-long workshop on custom raglan construction, during which she dropped all kinds of tantalizing tangential information about other sweater constructions and I scribbled marginalia like a fiend. Through her Custom Fit project, she’s gathered more data about the variety of bodies out there than anyone, and she’s helped a whole lot of knitters to lightbulb moments like the idea that the back of your body and the front of your body are shaped differently… and it’s okay to acknowledge that by knitting the back of your sweater and the front of your sweater to different dimensions. The sweater I made from that workshop fits me exactly the way I like it. (Footnote: I commend Amy for stepping away from the “knit to flatter” messaging of her first book to focus on the wearer’s comfort and pleasure in the final garment—we’re making some strides as a society and it’s heartening to see that reflected in the tone of important resources.)

Amy isn’t teaching or designing these days, but a lot of other insightful and talented people are offering learning opportunities online, sometimes for free or relatively accessible prices. I don’t have any desire to commodify the information I’ve gathered to inform my own knitting; I haven’t invented anything and all I know comes from studying the work of others and observing what works and what doesn’t on various bodies. I greatly respect those who earn a living as teachers, though, and encourage you to seek them out if you have the means. If you find what I share helpful, I’d love for you to support designers like Natalie Warner of Natalie In Stitches, whose blog posts offer a wealth of thoroughly researched and well-presented insight about every detail of our craft. Natalie also teaches regularly in online fora.

Round yoke sweaters: love ‘em and hate ‘em.

So, round yoke sweaters! They’re such a great design canvas; humans love to make circular artwork and the possibilities are practically endless. Some knitwear designers have found commercial success doing nothing but round yokes—that’s how compelling we knitters find these iconic sweaters. But a lot of us wind up a little deflated once the garment is off the needles and on our bodies. The fabric doesn’t lie flat across our chests, or there are extra pleats across the back, or it wants to ride up and mound around our necks, or we lift our arms and the whole sweater ascends to try to swallow our heads. We sadly conclude that this style does not work for us. (Okay, let’s be honest, some of us try to fix the problem with aggressive blocking, and when that doesn’t work, we set the sweater lovingly but regretfully in the back of the drawer… and cast on another, hoping for a different result.)

A round yoke sweater I designed in 2017 that fits me well.

Troubleshooting starts with assessment.

When I see these problems in sweaters, I try to deduce what’s going on. It’s always a question of too much or too little fabric in key areas, so the trick is to figure out whether you can redistribute the stitches to the areas where your body needs more ease. If you knit just the yoke of a round yoke sweater—and you can do this from a provisional cast-on if your sweater is designed bottom-up, and then either graft the pieces together or pick up stitches and knit the body and sleeves top-down—and then try it on, you can gain a lot of useful information. Take the time to put all the stitches on waste yarn and give your yoke a wash and block first, so you can assess the finished fabric.

  1. Where does the fabric naturally want to fall on your body? If you mark the points fore and aft of your arms, where it seems natural for sleeves to emerge, you may discover that the stitches remaining for the front and back are not equal. Some bodies are naturally 50/50, and nearly every sweater pattern is written as if this were the case, but many bodies aren’t. Your cross-chest measurement is probably greater than your cross-back measurement if you have a full bust. If you’re flat-chested or have shoulders that naturally curve forward a little, your cross-chest measurement may well be less than your cross-back. The solution is to move the sleeves, and I’ll go into detail about how to do that in my next post.
  • How does the fabric sit on the shoulders? Is the neckline lying smoothly against your body, or does it seem to have too much fabric? Move your arms around. Is there enough ease in the lower portion of the yoke to allow free movement, or does the whole yoke have to shift when you raise your arms? If things aren’t looking so good here, you’re going to need to do some ripping. The answer might be choosing a different size from the pattern—certainly if the yoke just seems too soupy all around, you’d want to consider this option—but there may be something amiss with the distribution of the shaping rounds, and I’ll talk about that in the third post of this series.
  • How deep is the yoke? Row gauge can be a real bugaboo, so this is a good moment to measure your yoke and compare it to the pattern’s schematic. If your yoke is significantly deeper or shallower than intended because your row gauge is off, this will make it tough to achieve a garment that fits well. You may need to consider adding or removing rows in the pattern, or—weirdly—changing needle material. If your stitch gauge is accurate, you don’t want to change needle size, but most knitters find they get a different row gauge working with wood needles vs. metal, and that may be a trick you can deploy to tame yoke depth issues in a re-knit.

If you have a completed yoke sweater that doesn’t fit well and you’re not ready to take scissors in hand and cut the yoke off, try laying it flat and comparing it to a sweater you like to wear. Where is it wider or narrower? I laid that custom raglan I mentioned on top of my Kennings round yoke to compare them. Both sweaters fit me well, but I was surprised how similar they are in shape. The yoke depth is identical; the necklines are the same. The round yoke is a little fuller through the point of the shoulder, but not as much as I expected, given that raglans don’t have a point of the shoulder built in at all. If I compared my Kennings to a sweater with a set-in sleeve, they’d be even closer.

What questions do you have at this point? If you use Instagram and want to post a photo of yourself wearing a round yoke with a problem in the fit, tag me in (@whistlinggirlknits) and I’ll pop over and see if I can offer any suggestions. (Note that I’m assuming a handful of you may take me up on this… if 600 people suddenly want to compare ideas on sweater fit, I’ll love you all for it and my desire to help will be burning bright, but I might need to call for backup!)

Next time we’ll do Part 2, the sleeve shift mods. If you don’t want to wait, my Instagram page has a Highlight called Sweater Surgery that you can read now to get the idea. That was a rather drastic project to move the sleeves on an already completed sweater, so don’t look if severed sleeves are going to stress you out. In the blog post I’ll focus more on the why of this mod, how to tell if you might need it, and how to set it up for a sweater that’s still in progress.

Be well, everybody!